My blog will chronicle my journey learning about contemporary quilting techniques and mixed media.
Showing posts with label project Quilting. Show all posts
Thursday, March 2, 2017
Project Quilting Season 8-5 Well Dressed Man
This is the fifth challenge for Project Quilting season 8! That means there is only one more this year. Time flies when you are creating, right. When I heard the challenge was, "Well Dressed Man", I had an idea right away. My husband was throwing a couple of his shirts away last week and I stopped him..because...well...Pinterest! That's right I dig things out of the garbage because of ideas I see on Pinterest! However, I realized I want to give that to someone and don't want to put it on the blog yet. In looking through my photos I realized I had the perfect well dressed men at my house. I had foot surgery the week before Thanksgiving so my son cooked and my husband did the dishes. So, at my house apron's and dish towels are what the well dressed men are wearing. Sounds good right? It makes it even better to know my son is a chef!
I printed a photo on to a prepared fabric sheets. This one has my son in an apron and you can see my husband in the background with a dish towel on his shoulder. I made it the pocket for my bag.
The other side of the bag has a chef as well.
The fabric is all of course cooking related. When my son graduated from Cordon Bleu I made him a chef related quilt.
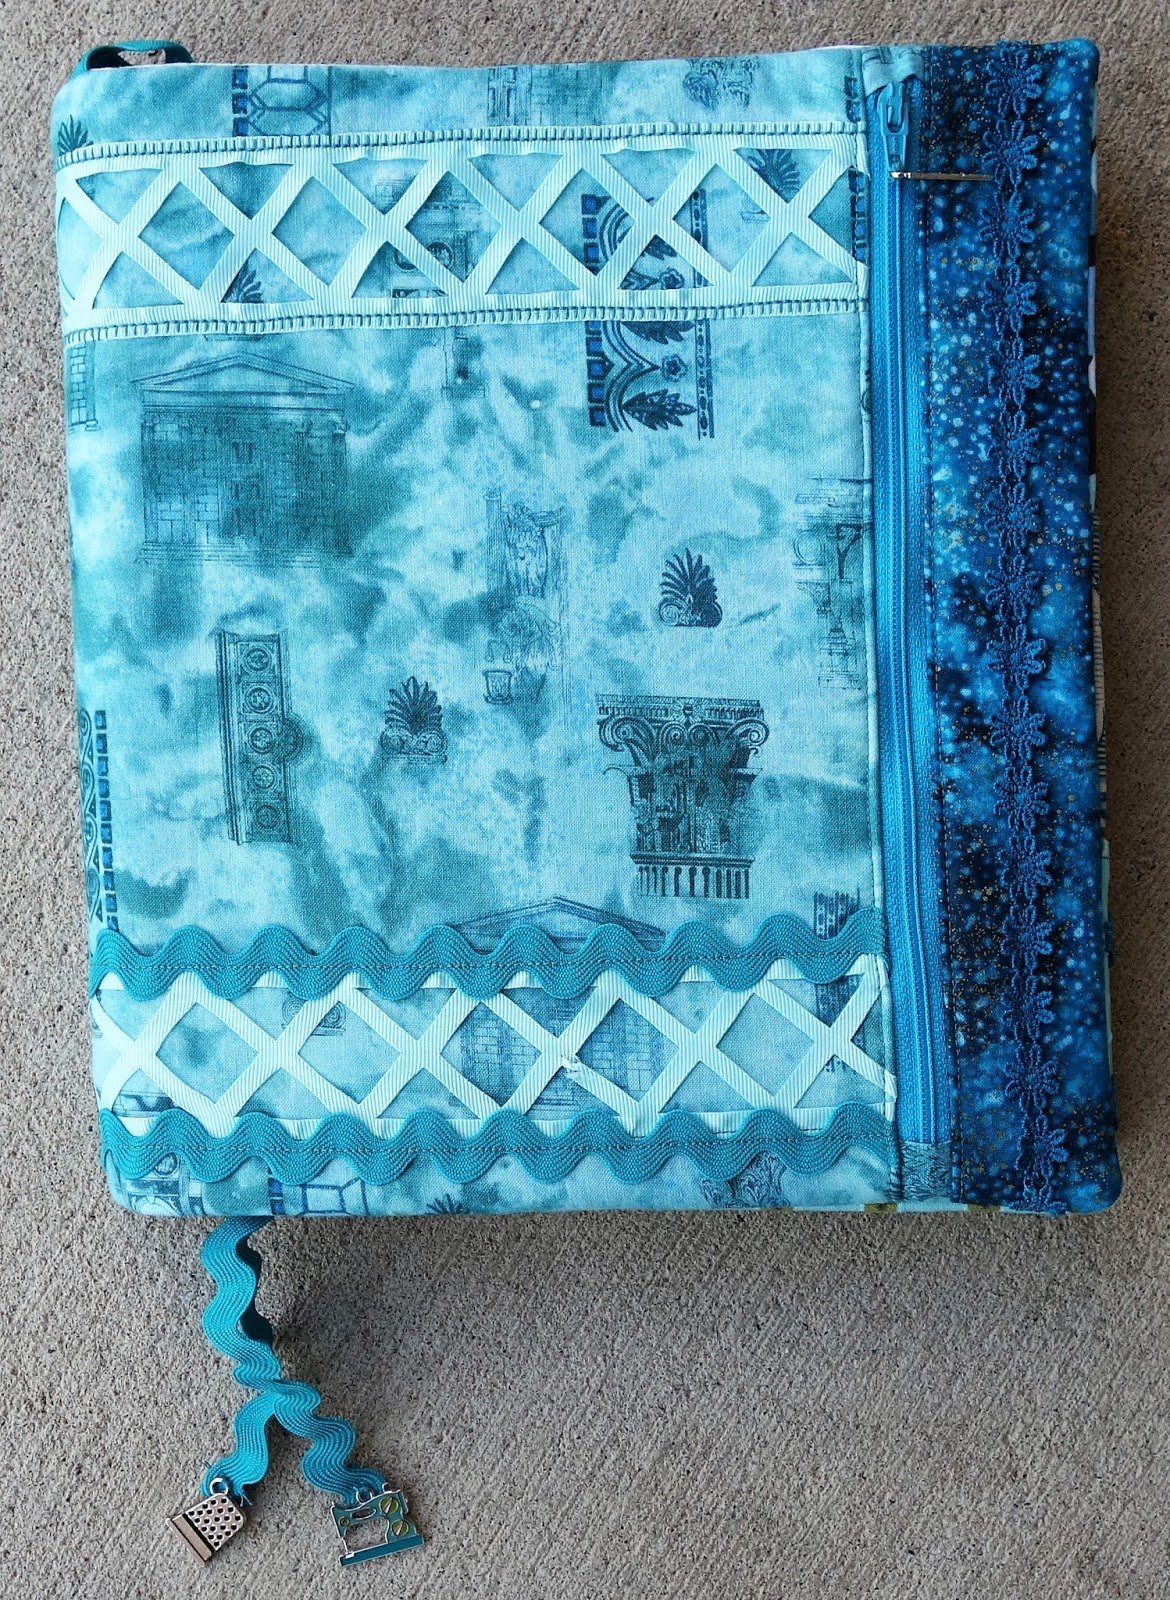
Here is the main fabric for the bag.
I kept the quilting simple, straight lines about an inch apart.
Next steps were the pockets and straps.
Finally the bottom and stitch it together.
The pattern is a free tutorial from The Inspired Wren. I have to confess I goofed and mine is oriented different than hers. My fabric is directional because of the words, I cut it so the longer side is opposite what it should have been. It was a "make it work" moment and I had to recut the bottom but it did work so all is good. Don't forget to pop over to Project Quilting beginning Sunday at noon until later in the day on Friday and pick your favorite. I guarantee you will be inspired by all the fabulous creations.
Have a Creative Day
Janet
Sunday, February 5, 2017
Project Quilting Season 8-3 Texture
Front of The Quilter's Planner |
Back of The Quilter's Planner |
Anyway between that and several other activities I didn't start my challenge until late Saturday afternoon. I have been wanting to make a cover for my planner so I combined two projects in one here. I bought The Quilter's Planner this year, a couple of weeks late, but better late than never. I am hoping to keep myself on track with my quilting and other activities. I do get things done each year but have some older projects I want to finish and somehow keep pushing to the side.
place markers |
There is an excellent video and download available on The Quilter's Planner website for how to make this cover, so I won't go into the details. (It does have three layers, including batting) I was not terribly creative this week with adding texture so be sure and go to the Project Quilting site to see the amazing entries. Kim Lapacek does a wonderful job creating inspiration for week long challenges. After noon today (Sunday) you can vote on your favorites. Well worth the time to get inspired to make your own creation. These women blow me away with their ability to create such works of beauty in only one week.
inside front cover pockets |
inside back cover pockets |
I added texture with different trims and by using a variety of fabrics. I was thinking of adding some big buttons on the front with some hand embroidery too, but decided I like it just the way it is.
buttons I thought about adding |
I love all the pockets!
zipper pocket on the front |
Have a creative day
Janet
Friday, January 6, 2017
Holey Eight Project Quilting Season 8
Project Quilting has begun. This is the eighth season for this challenge. In honor of this the first challenge is "Eight is great". You can go to Persimon Dreams to read more about the challenge. There are lot's of wonderful prizes to be given away.
I have had a couple of things going on in my life lately so haven't been doing quite as much sewing. Recovering well from foot surgery, although I may need some therapy yet. Also getting used to my new flexitouch therapy for Lymphedema which takes an hour in the morning and an hour in the evening. I was excited about participating in something creative again. So, I decided I could do it, just keep it small.
I started with some tiny pieced squares I had left over from another project.
I wanted to use eight squares. Having a hole in the center seemed like the easiest way, besides I am kind of fascinated by quilts with cut outs.
I added eight different embroidery stitches from The Embroidery Stitch Bible. I need a little more practice on a few of them. I also used eight different colors of floss. The final touch was eight seed beads added to each different bit of embroidery. Enjoy the step by step process.
First stitch added is the blanket stitch. "Uses: straight and gently curved edgings, couching, laid work, cut work, straight and curved outlines." *Note* all uses are from the Embroidery Stitch Bible.
Second stitch added is the running stitch. "Uses: straight and curved lines, outlines, as a quilting stitch, as a gathering stitch for smocking, as a foundation for other stitches."
Third is the chain stitch. "Uses: straight and curved lines."
Fourth is the coral stitch, although if you are familiar with this stitch you may not recognize mine. I kind of stretched it out a little here. "Uses: straight and curved lines with a beaded effect, closely worked rows make a textured filling."
The fifth is the rosette chain stitch and I will fully admit I need practice with this one. "Uses: borders and edgings, flower motifs."
Sixth is a loop stitch. "Uses: a broad, decorative line, straight or curved; several lines may be worked with interlocking 'arms,' as a filling stitch; couching, laid work, cut work, straight and curved outlines."
Seventh is the seeding stitch. I kind of like this one, simple and quick. "Uses: a simple filling stitch; it may be worked as an even scatter, to give texture to an area, or clustered to shade an area from one side to the other."
And the eighth stitch is french knots. One of my favorites! "Uses: a bold, raised dot, used singly (e.g. as an eye) or in groups (e.g. as a flower center); may be worked closely packed or evenly scattered as a textured filling, or clustered for a shaded filling. May also be worked with a short tail for a more organic effect."
And here it is with the eight beads added to each of the eight embroidery stitches, in eight colors of embroidery floss, on eight squares.
And just so you realize I did go small...
Only 4.5" square!
Have a creative day
Janet
I wanted to use eight squares. Having a hole in the center seemed like the easiest way, besides I am kind of fascinated by quilts with cut outs.
I added eight different embroidery stitches from The Embroidery Stitch Bible. I need a little more practice on a few of them. I also used eight different colors of floss. The final touch was eight seed beads added to each different bit of embroidery. Enjoy the step by step process.
First stitch added is the blanket stitch. "Uses: straight and gently curved edgings, couching, laid work, cut work, straight and curved outlines." *Note* all uses are from the Embroidery Stitch Bible.
Second stitch added is the running stitch. "Uses: straight and curved lines, outlines, as a quilting stitch, as a gathering stitch for smocking, as a foundation for other stitches."
Third is the chain stitch. "Uses: straight and curved lines."
Fourth is the coral stitch, although if you are familiar with this stitch you may not recognize mine. I kind of stretched it out a little here. "Uses: straight and curved lines with a beaded effect, closely worked rows make a textured filling."
The fifth is the rosette chain stitch and I will fully admit I need practice with this one. "Uses: borders and edgings, flower motifs."
Sixth is a loop stitch. "Uses: a broad, decorative line, straight or curved; several lines may be worked with interlocking 'arms,' as a filling stitch; couching, laid work, cut work, straight and curved outlines."
Seventh is the seeding stitch. I kind of like this one, simple and quick. "Uses: a simple filling stitch; it may be worked as an even scatter, to give texture to an area, or clustered to shade an area from one side to the other."
And the eighth stitch is french knots. One of my favorites! "Uses: a bold, raised dot, used singly (e.g. as an eye) or in groups (e.g. as a flower center); may be worked closely packed or evenly scattered as a textured filling, or clustered for a shaded filling. May also be worked with a short tail for a more organic effect."
And here it is with the eight beads added to each of the eight embroidery stitches, in eight colors of embroidery floss, on eight squares.
Only 4.5" square!
Have a creative day
Janet
Tuesday, April 12, 2016
Winnings!
I am a little behind in posting these winnings! I really enjoyed participating in Project Quilting this year. I have two more prizes from this experience. One is a pattern for two different size messenger bags. I won this for "Through the eyes of a child" a re-creation of one of my sons pieces of art.
Studio Cherie generously donated a downloadable pattern for everyone who entered! Wow! I finally had a chance to think about making this and printed my pattern. Haven't decided on fabric yet but I think I will make the larger size. Thank you Studio Cherie!
I also won a second set of aurifil threads. Love aurifil thread and I know it will be put to good use. Aren't these colors amazing! I won this in the final challenge "A Goose in the Monkey Wrench" Thank you Aurifil!
Hand Dyed Fabrics had a name the fabric contest on Facebook. I won! So excitied they sent me some gorgeous fabrics. I know the greens will be perfect for a couple of landscape art quilts I have planned.
This little beauty will be the center of a quilt. I can't wait to quilt this! It is gorgeous. They have such nice fabric be sure to check out their site online. Thank you Bill!
Have a Creative Day
Janet
Friday, March 18, 2016
Project Quilting 7 A Goose in the Monkey Wrench
The final challenge!
You still have time to enter the final challenge for this years Project Quilting. It is due at noon on Sunday, check out the instructions here.
This was my first year entering this challenge and I have enjoyed it. Some of my pieces were so-so and some I really liked. The important part for me was trying new techniques, and the challenge of creating within a certain time frame. It was fun to see how many different interpretations there were of the same theme. Here are all my entries for this season.
1. Confetti
2. Bird Watching Season
3. All About That Thread
4. Vacation
5. Through the eyes of a child
6. A Goose in a Monkey Wrench
I am inspired by the creativity of these wonderful participants and look forward to watching what they create in the future.
I have never made a mug rug (If you don't know what a mug rug is check here) and since I have a number of other projects I am trying to finish right now I decided to go small this week. Literally. We needed to include a flying geese block and a monkey wrench block in our piece. I shrunk my patterns by 50% to include in my mug rug.
Covering all the Bases |
I am calling it "Covering all the Bases" because I also included some literal geese and a monkey.
Don't forget to stop at the Persimon Dreams blog after Sunday noon to see all the entries and vote for your favorite. Or challenge yourself and add your own piece before the deadline. It is International Quilting weekend after all so what better way to spend the weekend than creating a new quilt.
Have a Creative Day
Janet
Thursday, March 3, 2016
Project Quilting 7 Through the eyes of a Child
This is the fifth piece for Project Quilting 7. The theme this week is Through the eyes of a Child. Children's artwork was a recommended source. I love this theme! I know when my kids were little I often thought about turning pieces of their art into pieces of my art. I always said 'someday' when I have time. Well I guess someday is here! I'm going to look around the house for more.
I wanted to finish early this week because my husband's birthday is this weekend and we want to go do something fun to celebrate. I did it! Done on Thursday, definitely a record for me. Be sure to check back sometime next week to see all the entries and vote for your favorite at Persimmon Dreams. There are some amazingly talented people creating these quilts.
I used a charcoal sketch made by my son in I think 5th or 6th grade. It was easy to find and one I always liked. I framed this one a long time ago and had it hanging on the wall.
I like these two fabrics, I found them at JoAnn fabrics, I really did not have anything in these colors. They are both designed by Tim Holtz ECLECTIC ELEMENTS. The lighter one is called Symphony and the darker one is called Ledger. I liked the musical connection in the background fabric.
This was very fun to make. It was completed on my Bernina as were all the quilts I have made for Project Quilting. I can't wait to make a few more. It might be fun to make a whole quilt with a dozen individual pieces of art, I'd better start looking for my saved box of art work. I knew there was a reason I kept all those treasures. This one I kept true to size, it is about 19" x 12".
Janet
Sunday, February 21, 2016
Project Quilting 7 Vacation
I am calling this quilt Unexpected Treasures in Unexpected Places. When my family goes on vacation we are all about new experiences in new places. Sharing these treasures with the people I care about most in the world only enhances the experience. While I wasn't on vacation when I found this treasure, I was with a huge number of people from my family. Yes, this really is most of my brothers and sisters and my nieces and nephews. If you look through the gap in the people, you can see the trestle bridge in the background, just beginning to light up.
My husband suggested I add a little police car with flashing lights at the end of the bridge. Our car was almost towed because there were too many of us to fit all the cars in the tiny parking lot. (They have built a bigger parking lot since we were there.) One of my sisters suggested adding a bike, since it is a bike trail. Another sister suggested adding my two kids from this picture.
I didn't think I could get any of the extras done by Sunday at noon. I may add one or the other at a later date. Don't forget from noon on Sunday until Thursday or Friday you can vote for your Project Quilting favorite. Please be sure to go and look at all the entries they are spectacular.
This is the photo I used to create my pattern, I took this one while I was there. It was fun and a challenge to create. It has raw edge appliqué, paint, fabric paint sticks, the white lights on the trestle beams are from a t-shirt iron on that you can cut to whatever shape you want. This one is a little bigger than my other challenges. It is 35" X 29".
If you ever go to see the bridge be sure and stay until dark so you can see the lights. This photo is blurry but it gives you an idea of how spectacular the whole bridge really is.
The scenery along the way is beautiful as well. You can look up more about the bridge here.
Have a creative day
Janet
Subscribe to:
Posts (Atom)