Search This Blog

Tutorials

Showing posts with label embellisher. Show all posts

Thursday, April 30, 2009

New fabric


I'm trying to recreate a photo of myself.  It's a photo of me from the 80's with the "Big" hair and shoulder pads.  I really want to make the jacket in the photo like the one in the photo.  Call me crazy but I did like that jacket.  Didn't think I would be able to unless I happened upon some fabric somewhere that looked similar.  Well, today I sat down at my embellisher and started to play.  At first I thought it wasn't going to work, it was too linear and the colors weren't quite right.  Than it accidently flipped over and guess what!  The back of fabric was very close to what I needed.  And even better, I like it!!
Here is what I did.  First I alternated black and pink yarn on the maroon fabric.  Like this, don't forget you can click on the images to enlarge them.


I covered it all with black tulle, which is to me magical.  Black tulle just disappears into the fabric when you place it on top of almost anything.  I pinned in the squares to keep it from shifting.  Like this

Than I took it to my embellisher and started to attach the yarn to the background fabric.  Like this


As I was embellishing, I was a little disappointed thinking it wasn't going to work, when a part of it flipped over and I saw the back.  That's when I remembered one of the best things about an embellisher is both sides are open for use.  The back of the fabric was perfect for what I wanted.
Always fun to have a surprise ending that turns out for the best.
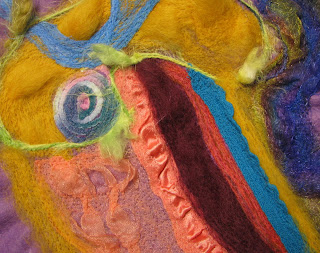
The first photo shows the front, the second shows the back.  which would you use?
Have a creative day. Janet


Monday, January 19, 2009

Embellisher

Hello,

     I thought I had everything ready to go yesterday.  Not quite!  I spent almost an hour looking for the instructional CD that came with my embellisher.  It came in one of those little paper sleeves.  I thought it was sitting right beside my computer, waiting patiently for me.  My husband even joined in helping me try to track it down.  It appears to have gone the way of the the extra socks that disappear from my washing machine to my dryer!  I'll have to call the store today to see if I can get an extra disk.  I think it showed how to change needles etc. and would be very helpful.  
     So, then I thought maybe it's online somewhere.  I wasted another half hour or more trying to find video of people using embellisher.  No luck with that either.  This gave me the idea, somewhere down the road, I hope to add some instructional videos to my site.  I need to learn a little more about blogging first so be patient with me.


     I did read the instruction book before I began and have posted a couple of photos of my first attempt.  I was just playing with different fibers to see how they will work .  The sample with lot's of different choices I used felt as my base and randomly added bits of yarn, roving, ribbon, several types of sheer fabrics.  I wanted texture in the final piece so I didn't felt everywhere.  It is pretty lumpy and bumpy, so I have to figure out how to get the texture in the piece and still have it lay flat.  Lot's to learn!  


The second piece is a hand dyed silk hanky that I have had for quite awhile and could never decide what to do with it.    I want to add something more to that piece yet.  Maybe some yarn or ribbon and some hand stitching.  I like the colors and the feel of it though.  The base for the silk hanky is the sleeve of an old wool jacket.  I bought some wool jackets at garage sells and goodwill and took them apart.  I washed them a couple of times and now I will use them for backing for different projects.
     I have the twelve needle embellisher.  Today I want to learn how to remove some of the needles and see how it changes the effect of the finished project if I just use a few at a time.  Have a fun day everyone!  Don't forget to play a little each day! Janet