Search This Blog

Tutorials

Thursday, October 31, 2013

Happy Halloween

Have a creative day
Janet

Thursday, October 24, 2013

Fairy garden & Door County

view from Eagle Tower
My husband and I took a trip to Door County in Wisconsin.  Just a nice relaxing week for the two of us.  We saw some fall color, some lighthouses, a birdseye view of Lake Michigan, and had a good time.

Cana Island Lighthouse
eagle tower
some of the fall color
The outside work is almost done, soon it will be snowing again.  We had a few flakes already but nothing measurable.  I should have more time for sewing and crafting again.

My husband helped me cut the front of a clay pot.

I wanted to make a fairy garden similar to some I had seen on a Facebook site called Creative Ideas.

I think it turned out nice.  I used a tiny tree my quilting friends gave me when my mom passed away.

The rest of the little things I purchased at a local nursery where tiny little gardens are very popular.

I want to make a sign for my garden to cover up the spot where the price sticker was attached.  I need to decide on a name for my garden first.  Any thoughts?

Have a creative Day
Janet


Monday, September 2, 2013

Borders finished and more

I finished the borders on the Wave Runner quilt tonight.  It has cooled off, so hopefully I can get a little quilting done this week too. 

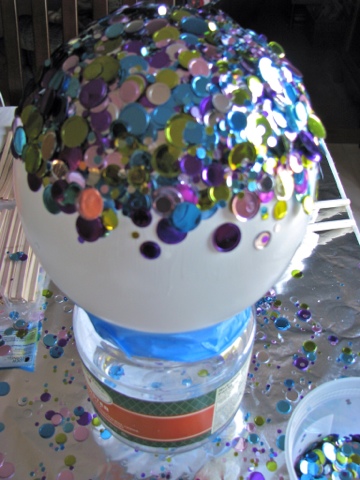
In the mean time, I also made another bowl.  I started this one right after I finished my autumn leaf bowl.  This confetti bowl had to be done in layers, so I added a little each day. 

 This time I was a little smarter and taped my balloon to the empty jar.

I haven't decided whether or not to trim the edge of the bowl.  


The one I saw on Pinterest was trimmed, but I'm liking this free form edge.

I also did a little experiment with another photo transfer.  I started with some wooden sticks.  

I taped the sticks together on the back side and did the transfer just like the last one I did.

I made one in pink.

and one in purple.

My daughter helped me cut them apart.  I've been playing with how I want to arrange the pieces.  

Once I figure that out they will need to have the final finishing coat added for protection. 

 The color is more vibrant after the final coat is added.
Have a creative day
Janet

Thursday, August 29, 2013

Pinterest Photo Project

This is a project I have been wanting to try for quite awhile.  Here is the first tutorial I found about how to transfer a photo to a piece of wood.  I also found this YouTube tutorial with even more instruction.  If you google transfer a photo to wood, you will find as many tutorials as you want.

I saw this Basswood Canvas made by Walnut Hollow at JoAnn Fabric's last week, and it happened to be on sale.  So, I quickly bought one to give this project a try.  I like this better than a solid piece of wood, just because it is lighter weight and so easier to hang (at least for me).

I chose this photo of my mom and dad from their wedding day.  I've always loved this one, they look so happy.  My son says it's because that is before they had eight kids. (Haha)  I reversed the photo, so it would end up the same orientation when I put it on the wood.  Next, I copied it to a disc, because I can't find my flashdrive.  (I loaned it to my son for a class project.) When I transferred to the disc, I used a high quality setting.  I drove to Office Max and asked them to print it for me, because a laser print is what everyone says works best.  My printer is ink.  I had it printed on cardstock because I hadn't thought thru this part yet when she asked what to print it on, it worked well for me.

I painted the sides of my canvas black.  I thought this would look good with my black and white photo.  I used Golden Gel Medium because I already had some.  I put the medium on the board itself and some on the photo too.  Just put your gel covered photo on the gel covered board, photo side to the board of course.  Smooth it out, either with a credit card or a squeegee.  I let mine dry over night.

In the morning I wet the back of the paper with a damp paper towel.  Let the water really sink in for a few minutes and start rubbing with your fingertips.  Be careful if you have long nails so you don't rip through to the wood.  Although if you do it could be an opportunity for a distressed photo.

It took about five minutes to get the initial layer off.  I rewet the paper at this point.  Rub with a little more caution now so you don't actually rub off the photo itself. I noticed I didn't quite have my photo lined up with the edges of my canvas but this was an easy touch up with the paint.


I still need to either gesso the picture or add some protective coating, but I think it turned out pretty nice.

Back to my Phd's.
Have a Creative Day
Janet

Tuesday, August 27, 2013

Wave Runner by Marlous Designs

Today's Phd (Project half done) is brought to you by Quilt Cove in Eagan, Minnesota.  I purchased this kit while on the Twin Cities shop hop and began piecing on a retreat with Minnesota Contemporary Quilters.  Came home from the retreat and left the quilt in the bag.  Oops!

It's really quick and easy.  You make straight blocks.  Cut them in a wonky design, and put them back together.  That's what quilters do best, take big pieces of fabric, cut it into small pieces of fabric and make a different big piece of fabric.

I just need to add the borders yet and than this one will move to the pile of quilts to be quilted.  It is too hot for quilting with my long arm right now.  My light bar above the machine is full of lights which add to the heat in the house.  With the heat index over one hundred every day right now...well, it's just not going to happen.  (The photo looks as though the whole quilt is wonky, but that is just my poor photography)

Next up is another Pinterest project.  I needed to stop and do something a little bit artsy.

Have a Creative Day
Janet